Review
In lecture Monday, we started the task of implementing Java’s LinkedList from scratch. Monday’s lecture was all about the fundamental building block for the LinkedList called a ListNode. As a reminder, the ListNode is defined as
public class ListNode {
    public int data;
    public ListNode next;
}
Which we link together by manually by writing code like
public class ListClient {
    public static void main(String[] args) {
        ListNode list;
        list = new ListNode();
        list.data = 42;

        list.next = new ListNode();
        list.next.data = -3;

        list.next.next = new ListNode();
        list.next.next.data = 17;
    }
}
Which produces the list we saw in class
Constructors
The code is a bit more complicated than necessary because we don’t provide a constructor that just sets the node up with the data desired. To fix this, we can provide a constructor:
public ListNode(int data) {
    this.data = data;
}
Which then lets us simplify the client code to
public class ListClient {
    public static void main(String[] args) {
        ListNode list;
        list = new ListNode(42);

        list.next = new ListNode(-3);

        list.next.next = new ListNode(17);
    }
}
We can even simplify this further by providing a constructor that also sets .next for us since we know what we want the .next to be right away. Here is the finalized version of the class and the client method that uses a constructor that takes both an int and ListNode.
public class ListNode {
    public int data;
    public ListNode next;

    public ListNode() {
        this(0, null);
    }

    public ListNode(int data) {
        this(data, null);
    }

    public ListNode(int data, ListNode next) {
        this.data = data;
        this.next = next;
    }
}

public class ListClient {
    public static void main(String[] args) {
        ListNode list = new ListNode(42, new ListNode(-3, new ListNode(17)));
    }
}
This just simplifies all the work of having to manually set the .data and .next fields since they are handled by the constructors.
Making ListNode Code More General
In both lectures, people asked is there a better way of handling these nodes without having to write out .next.next.next.... This will be the focus on Wednesday’s lecture, but we will introduce the concept for the first time here before starting lecture reviewing this idea.
Consider we had a variable list with many nodes that we wanted to print out each value. We could start by trying to write something like:
System.out.print(list.data + " ");
System.out.print(list.next.data + " ");
System.out.print(list.next.next.data + " ");
System.out.print(list.next.next.next.data + " ");
...
This will never work because we might not know how long this list is beforehand so we won’t know how many print statements to write. Additionally, we might run into a NullPointerException if the list was shorter and went too far down the list with too many .nexts.
Instead, we will need a new approach that somehow traverses the list by looking at each element in turn.
Key Idea: Use a local variable that moves through the list. It will keep track of the current node, do some computation (like printing), before moving to the next node.
We will quickly just show the final version code now, and then we will note why it is written this way below. It is okay if this doesn’t make sense now, we just want to expose you to this code pattern before we walk through it on Wednesday.
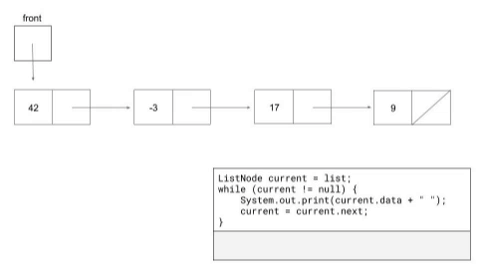
ListNode current = list;
while (current != null) {
    System.out.print(current.data + " ");
    current = current.next;
}
What is this doing?
currentis a variable that stores a reference to the current node we are looking at. It starts out at the front of the list, and on each iteration of the loop gets updated to point to the next node in the list.- We want to stop the loop once we have reached
null. It’s okay forcurrentto becomenull, but we must never say.dataor.nextoncurrentif it isnull.- One way of thinking about this: inside the loop we say
current.dataandcurrent.nextso we have to make surecurrentis notnull(hence the loop condition).
- One way of thinking about this: inside the loop we say
Here is a gif showing how the variables change throughout the program: